Viser innlegg med etiketten tutorial. Vis alle innlegg

torsdag 11. desember 2014

GLITTER TUTORIAL WITH COPIC

Hi my friends ♥

I have a little tutorial to show you today that I made for Copic Marker Norge and our traditional Christmas Calendar. 

I have made a doorhanging for my daugther, Gabriella with a lovely Magnolia image called Tilda in Evening Dress from the Little Circus Moscow collection 2014
You will find all my supplies at KREATIV SCRAPPING and I have put the links in the text

Here is my final result!
This glitter tecnique I was so lucky to learn from Irina Blount from LaLaLand this autumn when I did one of her classes in Norway and I have used it alot, and tried out a whole lot of different glitter and adhesive sheets.
Gabriella loved it!


A song while you look at all my pictures... ♥


This is what you need
The beautiful Tilda In Evening Dress fra Magnolia. Ultra fine glitter from Elizabeth Craft, Elisabeth Craft doublesided adhesive (out of stock at the moment) I used this one today and it is fine too even if it is a bit thinner. Memento to stamp with and Perfect Colouring Paper to stamp on. 

Stamp the image and cover it with the doublesided adhesive.
Use a Spellbinder die or similiar.

Remove the paper.

Sprinkle over the microglitter. I have tried several and this one is best I think. 

Use your finger to rub in the glitter. Takes a few minutes

I am done with mine, ready to start colouring!

A wee bit E21in the deepest shadow on the skin. Don't blend the colors together, just flick them together. 
Take your E51 and flick over the edge of your E21.

Do the same with E50 and E93 for cheeks 
This colouring only takes some minutes and is perfect for all your last Christmas cards ;)
The dress is W3-1-0 and I have used E44-42-41 for the hair. Around it is a mix of YR 24 (tiny bit) Y15-13, E51-50 and W1-0 or what you like best.

Done in 10 minutes :)

And here it is.
My Christmas Stocking from joy! Craft is covered with the most beautiful glitter vellum from Studio Callico

Wish you all a wonderful day!

Hugs


søndag 11. mai 2014

TUTORIAL, GIFTBOX FOR KREATIV SCRAPPING

Today I am showing something I made for Gabriella's birthday party on the Kreativ Scrapping blog.
Head over there and take a closer look.
HOPE YOU LIKE!
My Bella loved it ♥♥♥

Have a great day friends
Hugs, Jill

mandag 16. desember 2013

CMN-ADVENT CALENDAR-DAY 16

Hi my friends♥
With only Christmas a week ahead I have made a little something I want to share with you.
 
 
 I found a great tutorial on You Tube on how to fold a star and use it as a ornament for your tree. I am making a few of these for my friends, for their gifts, a sweet little thing to have on the tree as a memory from the Christmas 2013.
 
 
A Christmas song to you first ♥
 
You need
Paper
Cutter and scoreboard
Some glue. I use my ATG, so perfect for this job
Ink to disress with
Ribbon
Image, I used Joyful Piglet from Magnolia
Pearl with a little bit larger hole, has to be over 5mm
 

Cut 5 squares that measures 3x3" and two squares that is 11/2 x 11/2,and a little circle motiv.
My image is Joyful Piglet from Magnolia.
My Copic:
E00-000-0000 for the pig and E93 for cheeks
Ribbon around his neck E37-35-33-31

Distress all adges
Front and back for the big ones, and just the front for the small ones

Score at the black lines

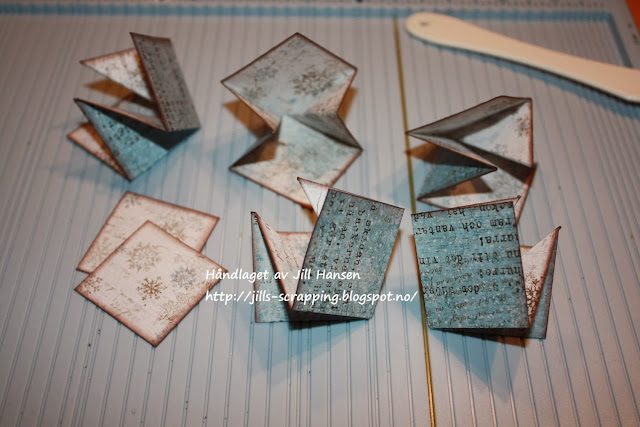
Fold it with the diagonal scoreline against eachother

Do all five like this

Glue them all together. like the picture.

When all five are glued together, it looks like this when you fold it.
Great isn't it!

Glue the ribbon, thread a pearl at both the ribbons and make a knot in the end.
When you drag the pearl against the knot it is possible to fold out the star. Fix it by dragging the pearl down to the star. DONE ♥

Perfect way to use some scrap papers ;)
Here are a few of the ones I did.
 
 
Good luck and have a wonderful week
hugs, Jill
 

fredag 13. desember 2013

SANTA LUCIA WITH CHRISTMAS BELLA

Hi my lovely blogland friends.
Today I have a special thing to share with you. As you remember Christine from Paper Nest Dolls drew a Gabriella image for me earlier for the Lucia day. I am so glad now the day is here, 13th december. Gabriella has really looked forward to this day and I have made her a gift.
Unfortunately she wasn't picked to be "main"Lucia, but I hope hope she gets a perfect day anyway. 
 
Two weeks ago I found a video tutorial linked by a lovely friend of mine to a fantastic giftbag made by Roben-Marie Smith. I just knew I had to make something similar. I took some photo along the way and I would love to share it with you today.
The tutorial that inspired me is to be found here
 
This is my giftbag for Gabriella
I think she will like it and it is made in a way so she don't have to tear it apart to open it, so she can save it at her room.

You will need two paperbags, booksheets or similar, an amazing PNDimage, glue, sewing mashine, dabber or acrylic paint, Frantage and some kind of twine.

Start by gluing the booksheets to one side of the bag. Use the side that dosn't  have the flip up or flip it down. Try to glue the places you won't sew as your sewing mashine does not like glue.

Sew around the whole base and also sew three times right over the bag. Don't trim the ends to much, but let them hang there for a shabby look.

Now the bag should look like this. Sew together the two paperbags, so that you now have one thick, wonderful bag. Don't sew the top!

Colour your image with Copic (or whatever you prefere)
Ink the edges and mat her on a piece of craft cardstock. Sew around image.

Make two holes in the top of your image and measure where to put the holes on the bag.
Use a Cropodile.

Make dots with a Dabber or Acrylic paint.
I have used Snow Cap, White Dabber. My favorite as I looove white ;)
 
While the paint is wet put on some Frantage Shabby white and heat it with your heatgun.


Lovely effect from the Frantage.


Put your gift inside.
Bella get a new Lip gloss that she wanted and tickets to a movie the four of us are going to see this sunday.
She is going to be superhappy ♥

Here it is ♥
Hope you like my little gift bag.
I loved making it and I will make some more for Christmas as I have a couple of shabby white lovers that I care about...
 
Have a wonderful day all
I would love to hear your opinion about my little project and I will be back later to share some photos of my Lucia.
Want to have your own Christmas Bella?
You find it in wonderful red rubber HERE at Kreativ Scrapping
 
HUGS ♥


lørdag 11. mai 2013

A tutorial and a card for my friend♥

Good morning my lovely friends and followers ♥
Today I will show you how I mask my images together. I love to create scenes with my stamps and especially my Magnolia stamps.
This is nothing new, but I just want to show you how I do it.
You will find this post in Norwegian at Kreativ Scrapping.
 
I love my Magnolia stamps so much and with all the wonderful new ones from the Once Upon a Time Collection making scenes are just so much fun!
I hope you like todays tutorial in how to mask images together.
 
Today I have used "Indian Tilda" and "Golden Creek" background from Magnolia
 
This is what you need:
Your stamps (two or more), Stamp paper (I use Perfect Colouring paper ) Inkpad (Black Memento is my choice since I need a waterbased inkpad for my Copic) Post it note papers og a regular white paper
Ok, lets go!
This is so fun ♥
I always make a test on a "normal"paper first, so I can see that the stamps is placed well together before I stamp on my PCP (perfect Colouring paper)
 
You must always stamp the image that should be in front first.
I have stamped my Indian Tilda both on the paper and on the post it note.
The one on the post it note should be as close to the sticky side as possible
 
Then cut out the post it note image as close to the lines as you can. A good scissor is a must!
 
Put the post it note Tilda on top of your stamped image.
 
Ok, now you are ready to stamp your background image on top.
I have used the wonderful Golden Creek image. Love it!!
 
Time to move the mask!
You will now have a perfect stamped scene to use on a card :)
I decided I wanted my Tilda to be more to the right, so I changed it a bit whan I did my "real" image. That is why I always make a test first!
 
And here she is my wonderful Indian Tilda almost ready to use...

Sometimes it is difficult to cut perfect around the image or the stamping goes, well not that perfect ;) and then I always use my Copic Multiliner (totally addicted!!)
You can see it behind Tilda and around the windows
 
And here is my image ready to use on a card
 coloured with my fantastic Copic Markers♥♥

And this is my card today.
Decorated with wonderful WOC flowers (soon at Kreativ Scrapping!!), a cute little charms and the beautiful Maja design Papers  "Vintage Spring Basics"


And this is my Copics:
A lot this time I'm afraid...
Skin: E21-51-50-93
Hair: E49-47-44-43-41
Dress: R24-22-02-01-00
Ground: W5-3-2-1-0, E81, E40
Houses: E84-81-40, BV 23-20,W1-0
Sky: BG: 72-71 (hjemmelaget)-70-000
Sun: R24, YR 68-23-21
Clouds: W3-1-0

Hope you will find this post inspiring. I would really hear what you think ♥
I have already made a few other masked scenes, and I will show them to you some other day.
Thanks for visiting me today and have a wonderful weekend

And to you Maritha..
Happy birthday my sweet, sweet friend ♥♥

hugs and kisses
Jill